ST701 BATTERY PROBLEMS
The majority of Fujica SLRs can use modern batteries without any problem. The notable exception is the ST701. The specification calls for the use of two E400N or EPX400 mercury batteries. Along with all other mercury type batteries these are no longer available. They were originally chosen by Fujica because they were cheap and had a stable discharge curve maintaining 1.35v. There are several options if you wish to use your 701.
Hand Held Meter
Advantages
Probably the most accurate and will give you the best results especially with slide film.
Disadvantages
Not very convenient.
Zinc Air Batteries
Advantages
These have the same basic chemistry as the original mercury batteries. The difference is that instead of mercuric oxide supplying the oxygen in a sealed package, there are holes in the case to allow atmospheric oxygen in. This means that the camera does not have to adjusted or modified.
Disadvantages
There are 2 major disadvantages of this type of cell. The batteries are not a sealed package and the holes that let the air in can just as easily let the chemical residue out causing a nasty case of corrosion. If you use this option, do not leave the batteries in the camera whilst not in use. The other problem is cost and the longevity of the cells. The batteries need to be activated before use and once the air gets to them, they will naturally discharge over time. Typically there are 7 holes in hearing aid batteries to provide a strong current source. This is not problem in hearing aids as the will be exhausted before they decay. However, in a camera, this is not so and they will only last about 2 months. Wein cells have only 2 holes and will last about 6 to 9 months. However, they are very expensive - about 10-15 times the price of hearing aid batteries.! One solution is to use hearing aid batteries and block all but 2 of the holes with nail varnish.
Alkaline or Silver Cells
Advantages
These are relatively cheap and easily obtainable.
Disadvantages
The voltage is wrong. Alkaline cells have a nominal voltage of 1.5v but this reduces as the battery is used so they will not give accurate results and are best avoided. Silver cells have a more steady output voltage but their nominal voltage is 1.55v and without some kind of fix, they will give inaccurate results. They will cause to meter to over read. On a bright sunny day (about EV17) this can be as much as 2 stops. However in low light conditions i.e. indoors (EV3-4) there is very little difference so adjusting the ASA doesn't really work. However, there are 2 fixes that do work. Although I have not tried it, it is possible to drop the voltage by using diodes. However, it is important to use the right sort to get the correct voltage drop and to make sure they can handle the current. Personally, I find the best solution is to trim the meter circuit. This is easier than diodes and gives acceptable results even with slide films. It might not be the most accurate, but it probably gives you the best results you can expect from a 30+ year old averaging light meter. The best silver cells to use are the SR45, 394, AG9 or 280-17.
Conclusions
I have found the most cost effective (in the long term) and safest option is to trim the meter. Any good camera technician should be able to re-calibrate your meter at a reasonable cost. Alternatively, you could do this yourself and then it's free. However, a word of warning! If you have worked on cameras before, the job is quite simple but many people, (myself included) ended up damaging the first camera they took apart. If you do feel you want to do it yourself here are the step by step instructions. My camera is one of the early models
ST701 BATTERY FIX
The first job is to remove the batteries, make a note of the shutter setting and ASA setting. I used 1/250 and ASA100 for reasons that will become clear later. You can now remove the top. To do this remove the screw on the back of the top and on the right hand end.
Next the film winder and rewind knobs have to come off.
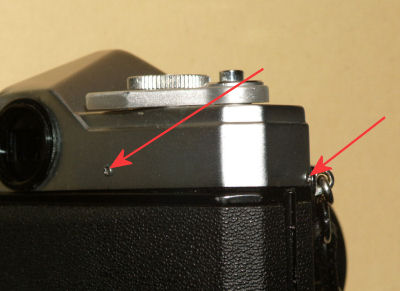
The top of the film crank handle needs to be unscrewed. This is a "normal" thread. Place the camera on a firm surface a use a "grip" tool to apply pressure and unscrew it. I use a soft rubber bung but anything that has good friction will do even a soft pencil eraser or the rubber bottom from a walking stick will do. Put the parts to one side and remember the order the washers came off in. Open the back, pull up the rewind crank slightly and unscrew it whilst holding a screwdriver or similar in the sprocket inside to stop it turning. Do not close the back!! Check the speed/ASA setting again! Gently lift off the top. It should look like this:
Now lift off the winding peg from the right hand side and remember which way it came off. If you put it back on upside down, the rewind crank angle will be different. Next unscrew the collar around the rewind shaft and remove. Do not push the shaft down otherwise you will not be able to get the back open again if you close it by mistake.
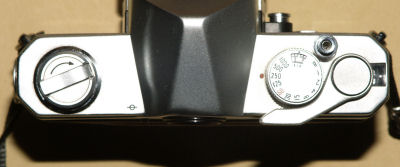
The top should now lift off.

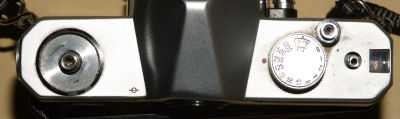
It is important to try not to upset the speed/ASA setting on either the camera or top or you will have a great deal of difficulty putting it back on. If you are going to try a diode fix, the best place to solder it in is here:
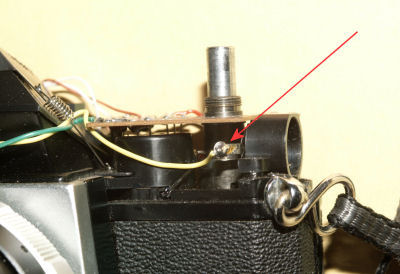
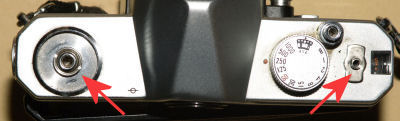
Assuming you are going to trim the meter, the pot for adjusting it is here:
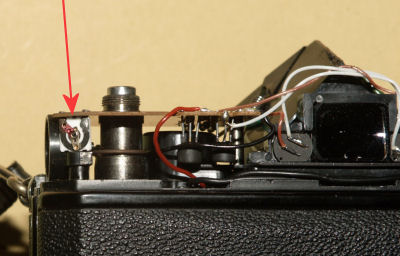
Unfortunately, the Fujica ST series of cameras have the batteries in the top and they earth through the top plate so it is a question of trial and error. I moved the slider about 15 o clockwise. The adjuster may be locked with some paint and will be stiff to move until this is "broken" Support the body of the pot until it moves. I then loosely reassembled the top, put some batteries in and went outside on a bright day. (Now you can see the reason for 1/250 100ASA!) and compared the camera reading with a known source. If the camera is over reading, move the slider further clockwise. If it is now under reading, move it back anti clockwise. Once you are happy, putting everything back is the reverse of taking it apart and should be relatively simple providing you haven't moved the shutter/ASA setting on either the camera or the top. If you have, you will have to work out the positions of the ASA pin and Shutter speed pin and try and get it lined up by eye. Take your time and don't force anything. You can see the slot for the ASA pin just above the arrow in the photo above and the pin for the Shutter speed selector is just below the central screw in this photo.
Hopefully, You now have a recalibrated meter which can use cheap long lived silver cells with little chance of them leaking. Happy Shooting.